
Do your gutter spikes keep pulling loose no matter how many times you tap them in? Has the hole become so wore out to the point that the spike doesn’t catch hold of the wood? You may want to consider switching your old gutter spikes with new gutter screws.
If you can reach your gutter spikes with a ladder, and you don’t mind climbing up there, then there is no reason not to switch out your gutter spikes for gutter screws.
Gutter Screws catch hold in holes that have been wore out by gutter spikes. If you nail in a gutter spike and it is immediately loose within a few days, you can replace them with gutter screws and get a few more years of support for your gutters.
WHAT YOU NEED
To replace your gutter spikes with gutter screws, you only need a few things:
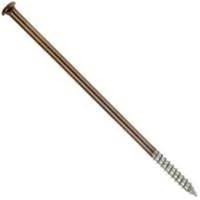
- Gutter Screws (w/ ferrules)
- Ladder
- Power Drill with required head
- Hammer or Pry Bar
- Helper
This should really be labeled as step 1. Gather all necessary tools to complete the task, including your gutter screws.
FERRULES
Ferrules are basically a shaft that goes around the gutter screw or gutter spike inside of the gutter. They act as a spacer that makes sure all the gutter screws are the same uniform length and keep the gutter perfectly straight. They also prevent you from over-tightening the screw and bending/damaging the gutter.
Your current gutter spikes may already have ferrules installed. If so, you will be able to use them again. When you pull the gutter spike from the hole, the ferrule will fall off into the gutter. Simply re-use the same ferrule for the same hole when installing the gutter screw.
If your new gutter screws came with new ferrules, then safely discard your old ferrules when you get rid of your old gutter spikes.

DIY STEPS
STEP 1: DETERMINE WHAT TYPE OF HEAD THE GUTTER SCREWS HAVE
Your gutter screws could have a variety of types of heads. The most common heads on gutter screws are flat head screw driver, Phillip’s head screw driver, or hex head. (socket wrench) Look at the head end of the gutter screw to determine what type of driver will be needed.
STEP 2: FIND THE APPROPRIATE DRIVER
Once you’ve determined what type of head is on the gutter screw, the next step will be to locate the matching driver for your drill and secure it to the drill. This way when you are up on the ladder, you have everything pre-set and ready to go.
STEP 3: SET THE LADDER AT YOUR STARTING POINT
Pick out a starting point on the home that you are going to work your way around and meet back at. I always start at the front left corner of the home and work may way around counter clockwise, but whatever way you decide to do will be fine.
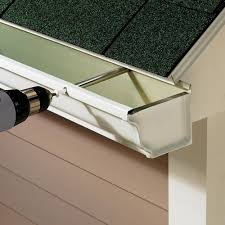
Once you’ve set up your ladder, you can climb up to the first gutter spike with your gutter screws, hammer, and power drill.
STEP 4: REMOVE THE GUTTER SPIKE(S)
Use the back end of the hammer to remove the gutter spike just as you would pry up a nail. We recommend removing and replacing one at a time until you get the hang of it. Once you’ve pulled the spike loose with the hammer, it should easily pull out by hand. You may have to wiggle it a bit, just be careful not to dent the gutter when doing this.
If you have ferrules on your gutter spikes they should fall off into the gutters. You are going to use them for the new gutter screw, unless your new screws came with new ferrules.
STEP 5: INSTALL THE GUTTER SCREW(S)
Once you’ve completely removed the gutter spike from the hole, it is time to install the gutter screw. Guide the gutter screw back into the same hole as the old hardware. If using ferrules, you’ll need to hold them up in line with the hole in the gutter so the gutter screw goes thru the inside of the ferrule.
Once the gutter screw touches the wood behind the gutter, you can now use the drill to screw it in the rest of the way. Tighten the gutter screw the same way you would tighten a normal screw. You don’t want to over-tighten them. We always suggest tightening until it locks, then maybe another quarter turn.
CONCLUSION
Repeat these steps all the way around the home until you have replaced every gutter spike with a gutter screw. This will hold your gutters up for another few years. How long, depends on the condition of your fascia board.
Although gutter screws are better than gutter spikes, they are still only a temporary solution. Nowadays gutter companies use hidden hangers that clip onto the inside of the gutter and fasten it to the wall with a self tapping screw. Therefore, if you can’t see gutter spikes sticking out of your gutters than you probably have the hidden hangers.
If your new gutter screws don’t bite, than you either need longer gutter screws, or your fascia board is too rotted/soft and needs to be replaced.
CONTACT THE EXPERTS AT MY GUTTER PRO

My Gutter Pro
93 Monocacy Blvd. A-6
Frederick, MD 21701
(973) 852-6987
Does your home have gutters?
If you answered yes than you should be following My Gutter Pro on Facebook. You will receive seasonal reminders, DIY tips, promo offers, FAQs, contests and giveaways, and much more! Don’t delay, join the My Gutter Pro Team today!
https://www.facebook.com/MyGutterPro
CLICK HERE to visit My Gutter Pro’s Official blog spot “Talking Gutters” for more informative articles.
RESOURCE LINK GUIDE


3 Responses
I am often to blogging and i actually admire your content. The article has actually peaks my interest. I’m going to bookmark your website and preserve checking for brand new information.
Awesome post.
Thanks for sharing with us.